6.11.3. Data manipulation
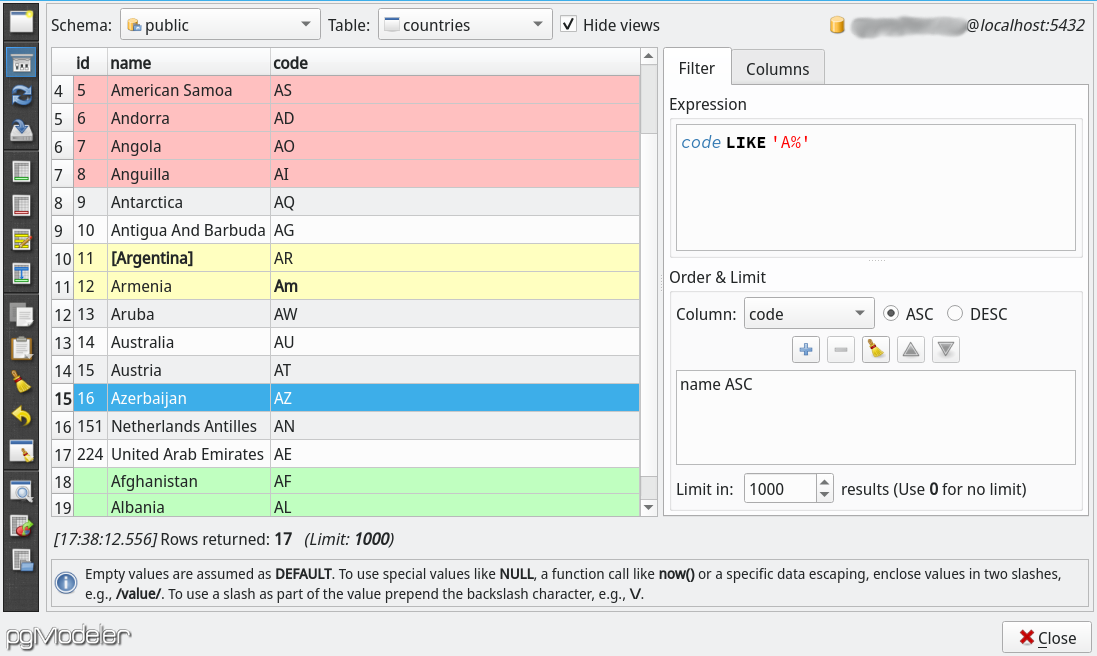
The data manipulation tool, a long-awaited feature requested still in pgModeler 0.8.0, is an extension to the SQL tool. As the name suggests, this feature enables the CRUD operations on tables and foreign tables, and the Read on views. The application implements this feature in separated dialogs like the one displayed below permitting the user to handle different relations at once.
The data manipulation dialog works as a batch of operations to be applied to a table, which means, you can insert, update and delete rows in the same transaction. The rows in the grid are colored according to the operations to be executed. As seen in the image below, green rows mean new data to be added. Yellow rows indicate changes to be applied and the columns with bold text indicate where the modification will occur. Red rows point data to be deleted.
There are additional features in this dialog that help in data filtering for instance. The first one is the Filter expression that works as the WHERE clause in a SELECT command. In that field, the user must inform a conditional expression to be used as a filter using SQL language without the keyword
WHERE. The second auxiliary field is the Order & Limit that controls the data sorting by columns (ascending or descending) and the limit of retrieved rows. The user is also able to quickly sort the results by a certain column by just clicking one header item in the results grids. The tab Columns allows the user to hide the columns from the current data set in order to better visualize only those needed columns.
Despite the usefulness of the data manipulation, there are some limitations that should be informed. The first one is that binary columns or bytea can't be directly handled and they will display the special value [binary data] in the grid. This is done to avoid overflows if the value of a column is too large for the cell to store it.
Another limitation is that handling tables without primary keys will cause delete and update operations to use all columns as primary keys. This because pgModeler needs to know which rows will be deleted or modified by using their ids as configured in the primary keys. In the absence of a primary key, the mentioned operations will adopt all columns as the primary key in order to minimize the changes done to the table since more data than expected by the user can be modified or deleted in the process. Below all controls and actions of the data manipulation dialog are fully explained.
| Action/Control | Description |
|---|---|
Schema |
This combo box lists all schemas. Changing the selected schema will automatically fill the Table combo box with all available tables in that. |
Table |
This combo lists all tables and views for the selected schema. |
Hide views |
Toggles the display of views in the table listing. |
New |
Triggered by Ctrl + N or clicking |
Filter |
The action |
Refresh |
By clicking the button F5 the grid will be refreshed using all additional filtering settings. Any work in progress in the grid like new data or rows marked to be deleted or updated will be discarded causing no data to be changed in the table. |
Save |
Applies all changes done in the grid to the table, in practice, DML commands are generated for each row and executed in the database. To perform this action click the button Ctrl+S. |
Add |
Click Ins to add a new empty row in the grid. |
Delete |
Marks the selected rows to be deleted when the action Del is triggered. |
Edit |
The action |
Duplicate |
Triggered by the action Ctrl+D it duplicates the selected rows in the grid. In order to enable the row duplication make sure to select all columns of the desired row. |
Copy |
Triggered by the icon Ctrl+C) or as a plain text buffer (Ctrl+Shift+C). |
Paste |
Pastes the contents of the clipboard into the grid using the action Ctrl+V. |
Clear |
The action Ctrl + R, clears the selection on the data grid. |
Export |
Exports the entire result set in the grid to a CSV file. This can be done by activating the button Ctrl+X. |
Browse |
Clicking the icon |
Undo |
Reverts any changes made in the grid by clicking Ctrl+Z |
Truncate |
The action Truncate and Truncate cascade. Both menu actions wipe out all data of the currently managed table but the cascade version also wipes out the data of all tables which somehow references the current one. Note that truncation is an irreversible action so use the feature with extreme caution. |
Load CSV |
The action Separator field, the text delimiter character by adjusting the field Text delimiter and indicate if the first row of the imported file contains the name of the columns using the option Columns in the first row. When this last option is checked pgModeler will match the values of the column names and fill only the ones present in the current table. |
6.11.3.1. Browsing references & referrers
This feature helps those who have to browse data in several tables that are related somehow. In releases prior to 0.9.0-beta1, the proper way to know which row in a table A was referenced by a row in table B was by opening the data manipulation dialog and use the set of filters which could be a bit annoying and time-consuming. So in order to minimize the task to find those rows this feature does some tricks in the backstage in order to perform the automatic filtering that the user needed to do manually.
Technically, when browsing a table in the data manipulation dialog pgModeler discovers and stores information about the primary and foreign keys of the current table. From that data, we are able to see all the rows in other tables that somehow reference the selected row in the currently managed table. The inverse way is possible too, to discover which rows in other tables are referenced by the browsed table from the selected row. It seems a bit confusing but let's detail based upon the image below.
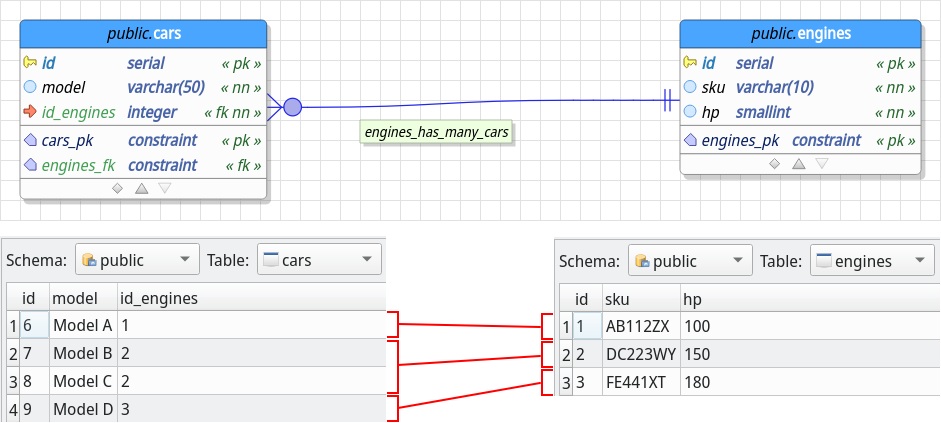
In the image we have a simple model which relates cars and engines. On the bottom-left, we have a set of cars that references a set of engine models as exposed in the bottom-right. Suppose that when browsing the cars table you need to know the engine which the Model A references, for instance. The only information we have is that Model A references the engine which id is 1. In order to show all details about the engine 1 we would need to open a new instance of the data manipulation dialog, browse the table public.engines and set up a filter id = 1 so we can expose all details about that engine. This is the way things were done before the introduction of the row navigation feature.
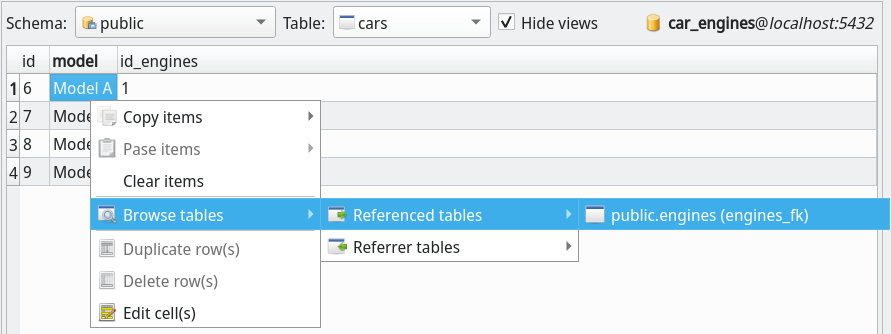
Being said that, using the row navigation feature, you would simply select the row related to Model A, right-click it to show the context menu, and follow Browse tables > Referenced tables > public.engine (engines_fk). Note that the item named after the referenced table public.engines contains the name of the foreign key in public.cars which denotes the relationship between them, in that case, engines_fk.
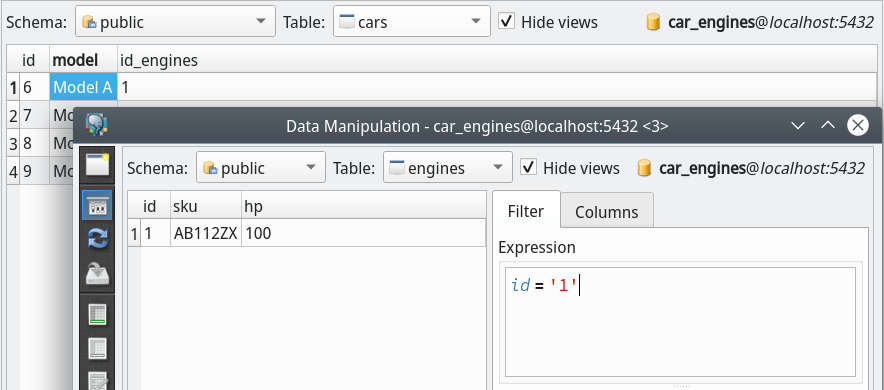
Once clicked the mentioned menu item, a new instance of the data manipulation dialog is open and automatically filters the results to show only the engine which code is that one referenced by the Model A. See how shorter was the path to achieve the same result compared to the classic way. This is a small change that makes a lot of difference when handling several tables that are linked.
You can still play around with the new instance of the dialog and try the inverse. Right click the row related to engine 1 and select Browse tables > Referrer tables > public.cars (engines_fk) to see all rows in public.cars that reference the selected row in public.engines.